Gracie Barra Bristol, (BJJ), Can Sönmez, Bristol, UK - 15/09/2011
The back is a great position to be in. There are lots of submissions, your opponent can't easily see what you're doing, and you'll also get four points in competition (once you've got your hooks in). The first thing to note is a basic safety point, which is don't cross your feet. If you cross your feet, then all your partner has to do is cross their feet over yours and bridge, footlocking you. Instead, you want to be hooking your insteps inside their legs.
Second, you want to get a good grip with your arms. The harness grip (as always, various other names, like over-under) is a solid option for both gi and nogi. Begin by getting an arm under their same side armpit, so they can't slide down (as otherwise they can go for the escape I taught last week). If they have a gi, you can help secure the position by grabbing their opposite collar. The other arm comes over their shoulder.
If you can't grab a collar, then link your hands together, using that to lock yourself in place. You could also grab under both arms grabbing a collar, which is a excellent way to hold them in place. However, that means both your arms are occupied: for attacks, you have more options if you keep one arm free, to go over the shoulder.
Your arm by the shoulder is the one you'll be looking to shift into their neck and/or grabbing a collar, where you can start working for a choke. Stephan Kesting advises that rather than linking hands, you can grab your own arm, which in turn means you are blocking the best grip your opponent wants to get. As ever, play around and see what you prefer.
Third, keep your chest pressed against their upper back. To escape, they need to create space, so don't let them have any: stay glued to their upper back. You also don't want them to put you flat on your back, like in the bridge escape we saw last week, as then they can start moving their hips. If you drop back, make sure you've moved to the side. However, your ideal position is getting them face down.
Fourth, follow them with your hips, similar as when you're in their guard. If you keep moving your hips to square back up whenever they try and shift away, that again stops them creating space.
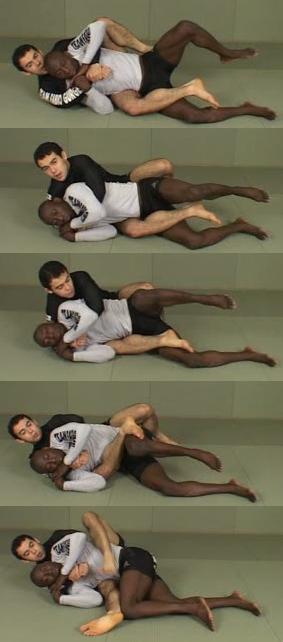 Finally, you want to keep your head locked to theirs, providing additional control. It also helps you to see what they're doing. Otherwise, their head would be blocking your line of sight. Place your head next to theirs on the armpit hand side, as that way you're controlling both sides of their skull.
 From here, you might find they manage to knock off one of your hooks, or perhaps you're struggling to establish that second hook. If that happens, in order to take the back fully, use the grip you have with your arms to put them on your side, towards your remaining hook. Come up a little on your elbow and pull your remaining hook up slightly. Bring that foot across their body to hook their other leg. You're looking to retain enough control that you can then reinsert your second hook, particularly if their reaction is to kick out that leg.
 There are numerous other possibilities when you lose a hook. Andre Galvao shows a simple option for retaking the back, which works well as a drill. They manage to clear one of your hooks and start bringing their hips over. Press your chest into their shoulder and roll them on their side, in the direction they were escaping. Use the foot they've dislodged to post , raising yourself up enough that you can slide your dislodged knee high up their back. Sit back and roll them towards your remaining hook, onto their other side, then re-establish your second hook. You can keep doing that from side to side as a drill.
 Back mount is a great position, but if you're about to lose it because they're slipping free, you can also try a basic method of shifting to mount. They've cleared one hook and have put their shoulders onto the mat. It might be tough regain your back mount from here, especially if they've moved over your leg or have it under their body. Instead, shift so that you can bring your remaining hook over their body. Clamp that heel to their far hip, making sure it is providing you with enough control that they can't simply shrug you off. Pull out your elbow for base, then turn and slide through into mount.
That was a good class, thanks again.
ReplyDeleteLast week you mentioned that when escaping the back grab there was one instance where you might not want to 'follow the finger' (ie. where you might want to move towards the over-the-shoulder side). What are the circumstances where this might be a good idea?
Cheers! Glad it was of use.
ReplyDeleteGenerally, the hand of the choking arm points the way out, as if you drop to the choking elbow side, you're helping them get the submission.
To initially relieve some pressure, you can try leaning forwards and turning your head towards the choking elbow, but still dropping to the choking hand side.
The exception I presumably had in mind was if you're looking to do the escape where you pop over their hips and move around, but they've anticipated. To try and prevent your escape, as you're dropping to the choking hand side, they've scooted their hips right out, meaning it becomes tough to roll to that side.
That means it may make more sense to drop to the other side and do the same escape in that direction instead. Of course, you'll have to be extra careful of your neck, as it is more vulnerable there.
Something Xande covers on his DVD set.